K8s 认证授权流程及 EKS 用户管理
编辑于2020年12月,Google Docs 导入。
目前使用 Rancher 管理集群及结合 LDAP 用户管理。支持多云的场景。
本文只做知识记录。
Kubernetes Authentication & Authorization
Kubernetes 背景知识
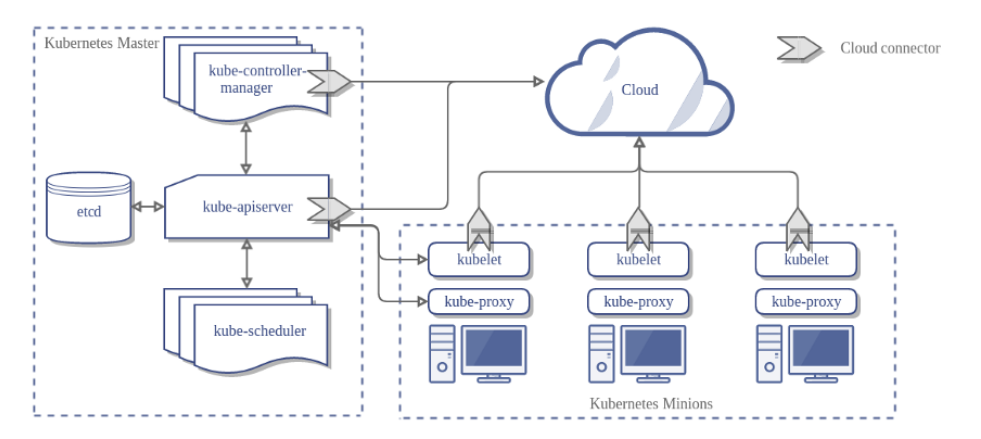
整体架构,来源:Components of Kubernetes Architecture | by Gaurav Gupta
比较典型的 Master-Slave 架构。而 apiserver 是核心中的核心。
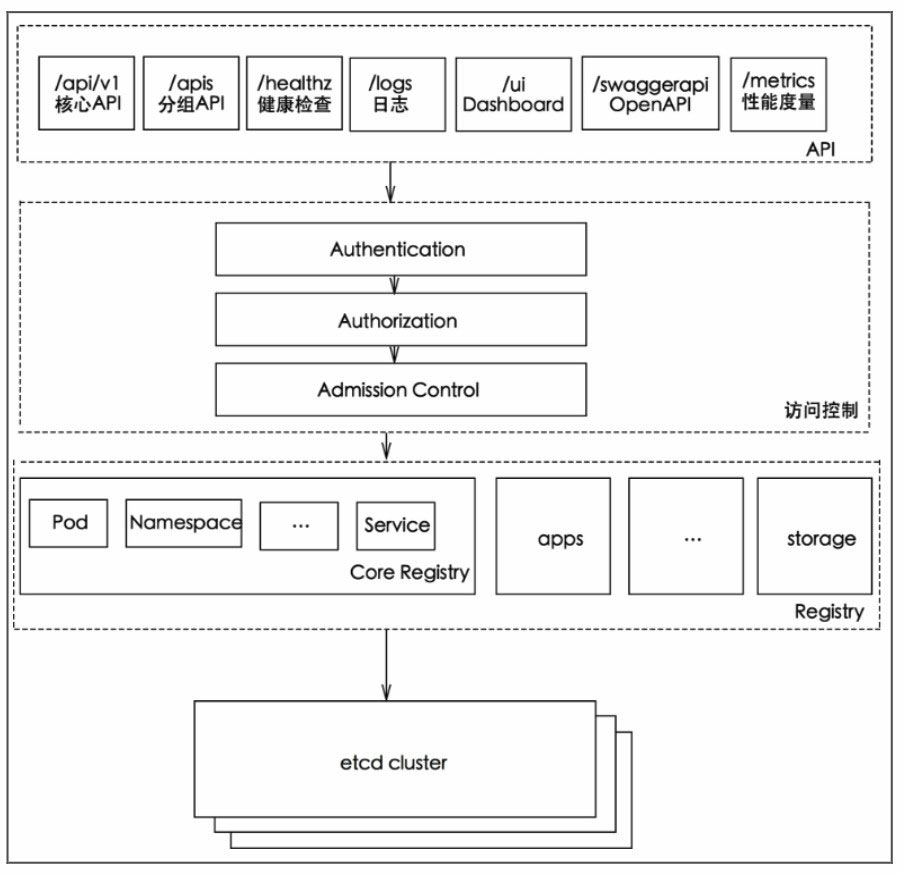
apiserver 架构,来源:???
单单 apiserver 本身,可以理解为一个后端连接 etcd 作为数据库的,仅仅执行 CRUD 操作的 API 服务。CRUD 的对象,就是我们说的 API Resource,比如 Pod, Service 等内置资源,还有开发者自定义的资源。
具体的工作由各种 controllers (包括 kubelet )来执行。这些 controllers 通过 watch apiserver,其本质是 etcd 的 watch 功能,能及时获得新的指令。
这个机制,形成了 Kubernetes 可以声明式地进行部署应用的能力。也叫做控制器模式。
Authentication
不管是通过 kubectl,还是直接访问 kubernetes-apiserver,对 kubernetes-apiserver 的 API 的访问都是受保护的,也就是,访问首先需要认证请求方。
一个“用户”从集群获取 API Resource,需要经过 Authentication/ Authorization/ AdmissionControl 这三大步骤。Authentication/ Authorization/ AdmissionControl 是高度模块化的,可以按需自定义开发。(如图,Authentication 模块使用积木拼图表示)
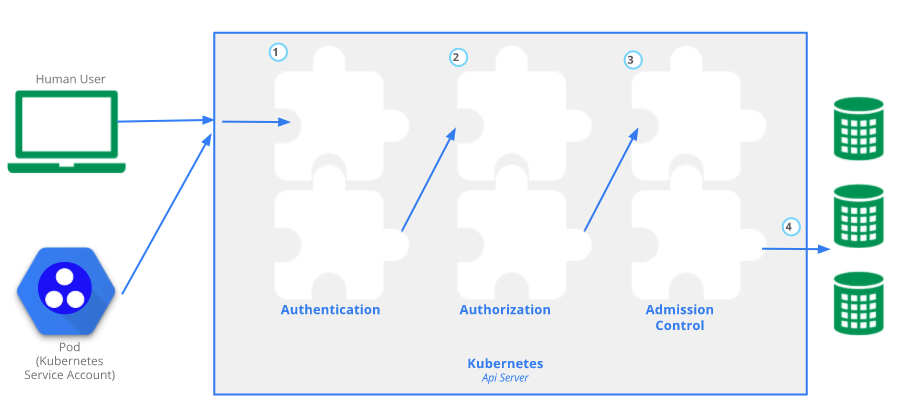
定义“用户”
在 Kubernetes 下有两类“用户”:
- human user:比如使用 kubectl/helm 等命令操作集群的用户。
- service account:其他非人用户。Kubernetes 中 Pod 访问 kubernetes-apiserver 也是需要认证的。
值得注意的是,Kubernetes 有 ServiceAccount API Resource,ServiceAccount 由 Kubernetes 自己管理。ServiceAccount 是 namespaced(单个 namespace 范围内可见),其包含 Secret API Resource,Secret 包含了用于认证 apiserver 的 Token。
Service accounts are users managed by the Kubernetes API. They are bound to specific namespaces, and created automatically by the API server or manually through API calls. Service accounts are tied to a set of credentials stored as Secrets, which are mounted into pods allowing in-cluster processes to talk to the Kubernetes API.
使用命令查看 serviceaccount 及 secret。
$ kubectl describe serviceaccounts default
Name:                default
Namespace:           default
Labels:              <none>
Annotations:         <none>
Image pull secrets:  <none>
Mountable secrets:   default-token-5j9r6
Tokens:              default-token-5j9r6
Events:              <none>

$ kubectl describe secret default-token-5j9r6
Name:         default-token-5j9r6
Namespace:    default
Labels:       <none>
Annotations:  kubernetes.io/service-account.name: default
              kubernetes.io/service-account.uid: 2825782d-7d3d-4090-a4f9-014c5c137ede

Type:  kubernetes.io/service-account-token

Data
====
ca.crt:     1025 bytes
namespace:  7 bytes
token:      eyJhbGciOiJSUzI1NiIsImtpZCI6ImNONzV6eWFBSm50NkIxV3BSWGtsMG1OYk5jTVJoX1dxS083a0g3LU9JcVkifQ.eyJpc3MiOiJrdWJlcm5ldGVzL3NlcnZpY2VhY2NvdWIiwi[MASKED]
而没有 User API Resource(没法直接通过 kubectl 创建),Kubernetes 假设有一个与集群独立的第三方维护用户信息。比较特殊的是,使用集群 CA 签发的证书也可以进行用户认证,username 就是证书中的 common name。
Even though a normal user cannot be added via an API call, any user that presents a valid certificate signed by the cluster’s certificate authority (CA) is considered authenticated. In this configuration, Kubernetes determines the username from the common name field in the ‘subject’ of the cert (e.g., “/CN=bob”). From there, the role based access control (RBAC) sub-system would determine whether the user is authorized to perform a specific operation on a resource. For more details, refer to the normal users topic in certificate request for more details about this.
虽然没有 user API Resource,但 apiserver 内部是有 user/group 的概念的。以下是从代码中找到的内置 user/group。在 system:masters 这个组内的用户,具有整个集群管理员的权限。
// well-known user and group names
const (
	SystemPrivilegedGroup = "system:masters"
	NodesGroup            = "system:nodes"
	AllUnauthenticated    = "system:unauthenticated"
	AllAuthenticated      = "system:authenticated"

	Anonymous     = "system:anonymous"
	APIServerUser = "system:apiserver"

	// core kubernetes process identities
	KubeProxy             = "system:kube-proxy"
	KubeControllerManager = "system:kube-controller-manager"
	KubeScheduler         = "system:kube-scheduler"
)
认证策略
对于 ServiceAccount 的认证,使用 Service Account Token 方式认证。
对于 normal user,有如下多种方式,选择一种即可(选择多种,apiserver 会尝试多种认证方式,直到有一种方式认证成功,即结束):
- X509 Client Certs:上文有涉及。阿里云的托管集群,默认使用这种方式。
- Static Token File:静态文件,revoke 不方便,不建议使用。Currently, tokens last indefinitely, and the token list cannot be changed without restarting API server.
- Bearer Token:怎么生成的不清楚。举例:Authorization: Bearer 31ada4fd-adec-460c-809a-9e56ceb75269
- Bootstrap Tokens:存储在 kube-system namespace 下的 secret,一定程度手动维护。a dynamically-managed Bearer token type called a Bootstrap Token. These tokens are stored as Secrets in the kube-system namespace, where they can be dynamically managed and created. Controller Manager contains a TokenCleaner controller that deletes bootstrap tokens as they expire.
- OpenID Connect Tokens:需要选择 OAuth2 providers,比如使用 Google Auth。
- Webhook Token Authentication:EKS 使用这种,后文重点讲解。
Authentication 如果失败,返回 401。如果成功,其重要输出就是 username。
Kubernetes Authorization (RBAC)
我们就以 RBAC 举例讲 Kubernetes Authorization。集群一般会通过配置 RBAC 来控制权限。
接上一步 Kubernetes Authentication 的成功结果,得到了 username。在 Authorization 阶段,就是与 RBAC 权限对照,检查 username 是否有权限访问资源。
Default ClusterRole/Role
Kubernetes 内置了4 种面向用户的 ClusterRole。
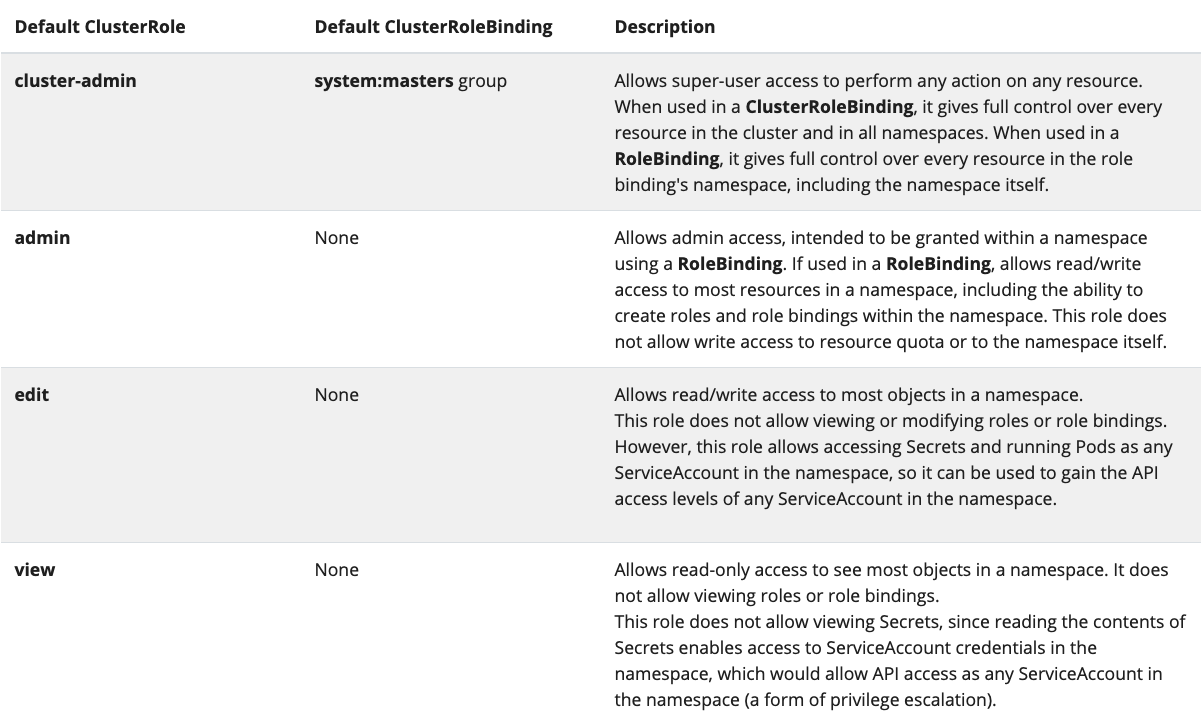
来源:https://kubernetes.io/docs/reference/access-authn-authz/rbac/#user-facing-roles
示例,将 edit 这个 ClusterRole,赋予用户 integ-user。
kind: RoleBinding
apiVersion: rbac.authorization.k8s.io/v1beta1
metadata:
  name: integ-role-binding
  namespace: argo
subjects:
- kind: User
  name: integ-user
roleRef:
  kind: ClusterRole
  name: edit
  apiGroup: rbac.authorization.k8s.io
更精细的权限管理,需要自定义 ClusterRole/Role。
示例,定义一个 ClusterRole,其有对 workflows 这个资源的所有权限。其中 workflows 是定义自 argoproj.io 的资源。
kind: ClusterRole
apiVersion: rbac.authorization.k8s.io/v1beta1
metadata:
  name: workflow-edit-role
  labels:
    rbac.authorization.k8s.io/aggregate-to-edit: "true"
rules:
  - apiGroups:
      - "argoproj.io"
    resources:
      - "workflows"
    verbs:
      - "create"
      - "delete"
      - "describe"
      - "get"
      - "list"
      - "patch"
      - "update"
      - "watch"
Admission Control
Authentication & Authorization 通过后,request 进入 Admission Control 流程。
Admission Control 主要是两个功能:
- 改写 request
- 验证 request
Admission Control 默认有如下功能:
NamespaceLifecycle, LimitRanger, ServiceAccount, TaintNodesByCondition, Priority, DefaultTolerationSeconds, DefaultStorageClass, StorageObjectInUseProtection, PersistentVolumeClaimResize, RuntimeClass, CertificateApproval, CertificateSigning, CertificateSubjectRestriction, DefaultIngressClass, MutatingAdmissionWebhook, ValidatingAdmissionWebhook, ResourceQuota, …
以 ResourceQuota 为例,用于检查 request 中的申请的资源没有超过 namespace 的限额,这是验证 request 的例子:
This admission controller will observe the incoming request and ensure that it does not violate any of the constraints enumerated in the ResourceQuota object in a Namespace. If you are using ResourceQuota objects in your Kubernetes deployment, you MUST use this admission controller to enforce quota constraints.
以 DefaultStorageClass 为例,创建 PVC 对象的 request 不指定 StorageClass,如果有默认的 StorageClass,改写 request,添加 StorageClass。
This admission controller observes creation of PersistentVolumeClaim objects that do not request any specific storage class and automatically adds a default storage class to them. This way, users that do not request any special storage class do not need to care about them at all and they will get the default one.
Admission Control 也提供了接口,方便开发者自定义开发组件。这里不再详细展开。
参考:
EKS Authentication
AWS EKS 是 AWS 提供的 Kubernetes 托管服务。在认证这块,EKS 结合了 AWS IAM,可以复用 IAM 的用户体系。
IAM 简介
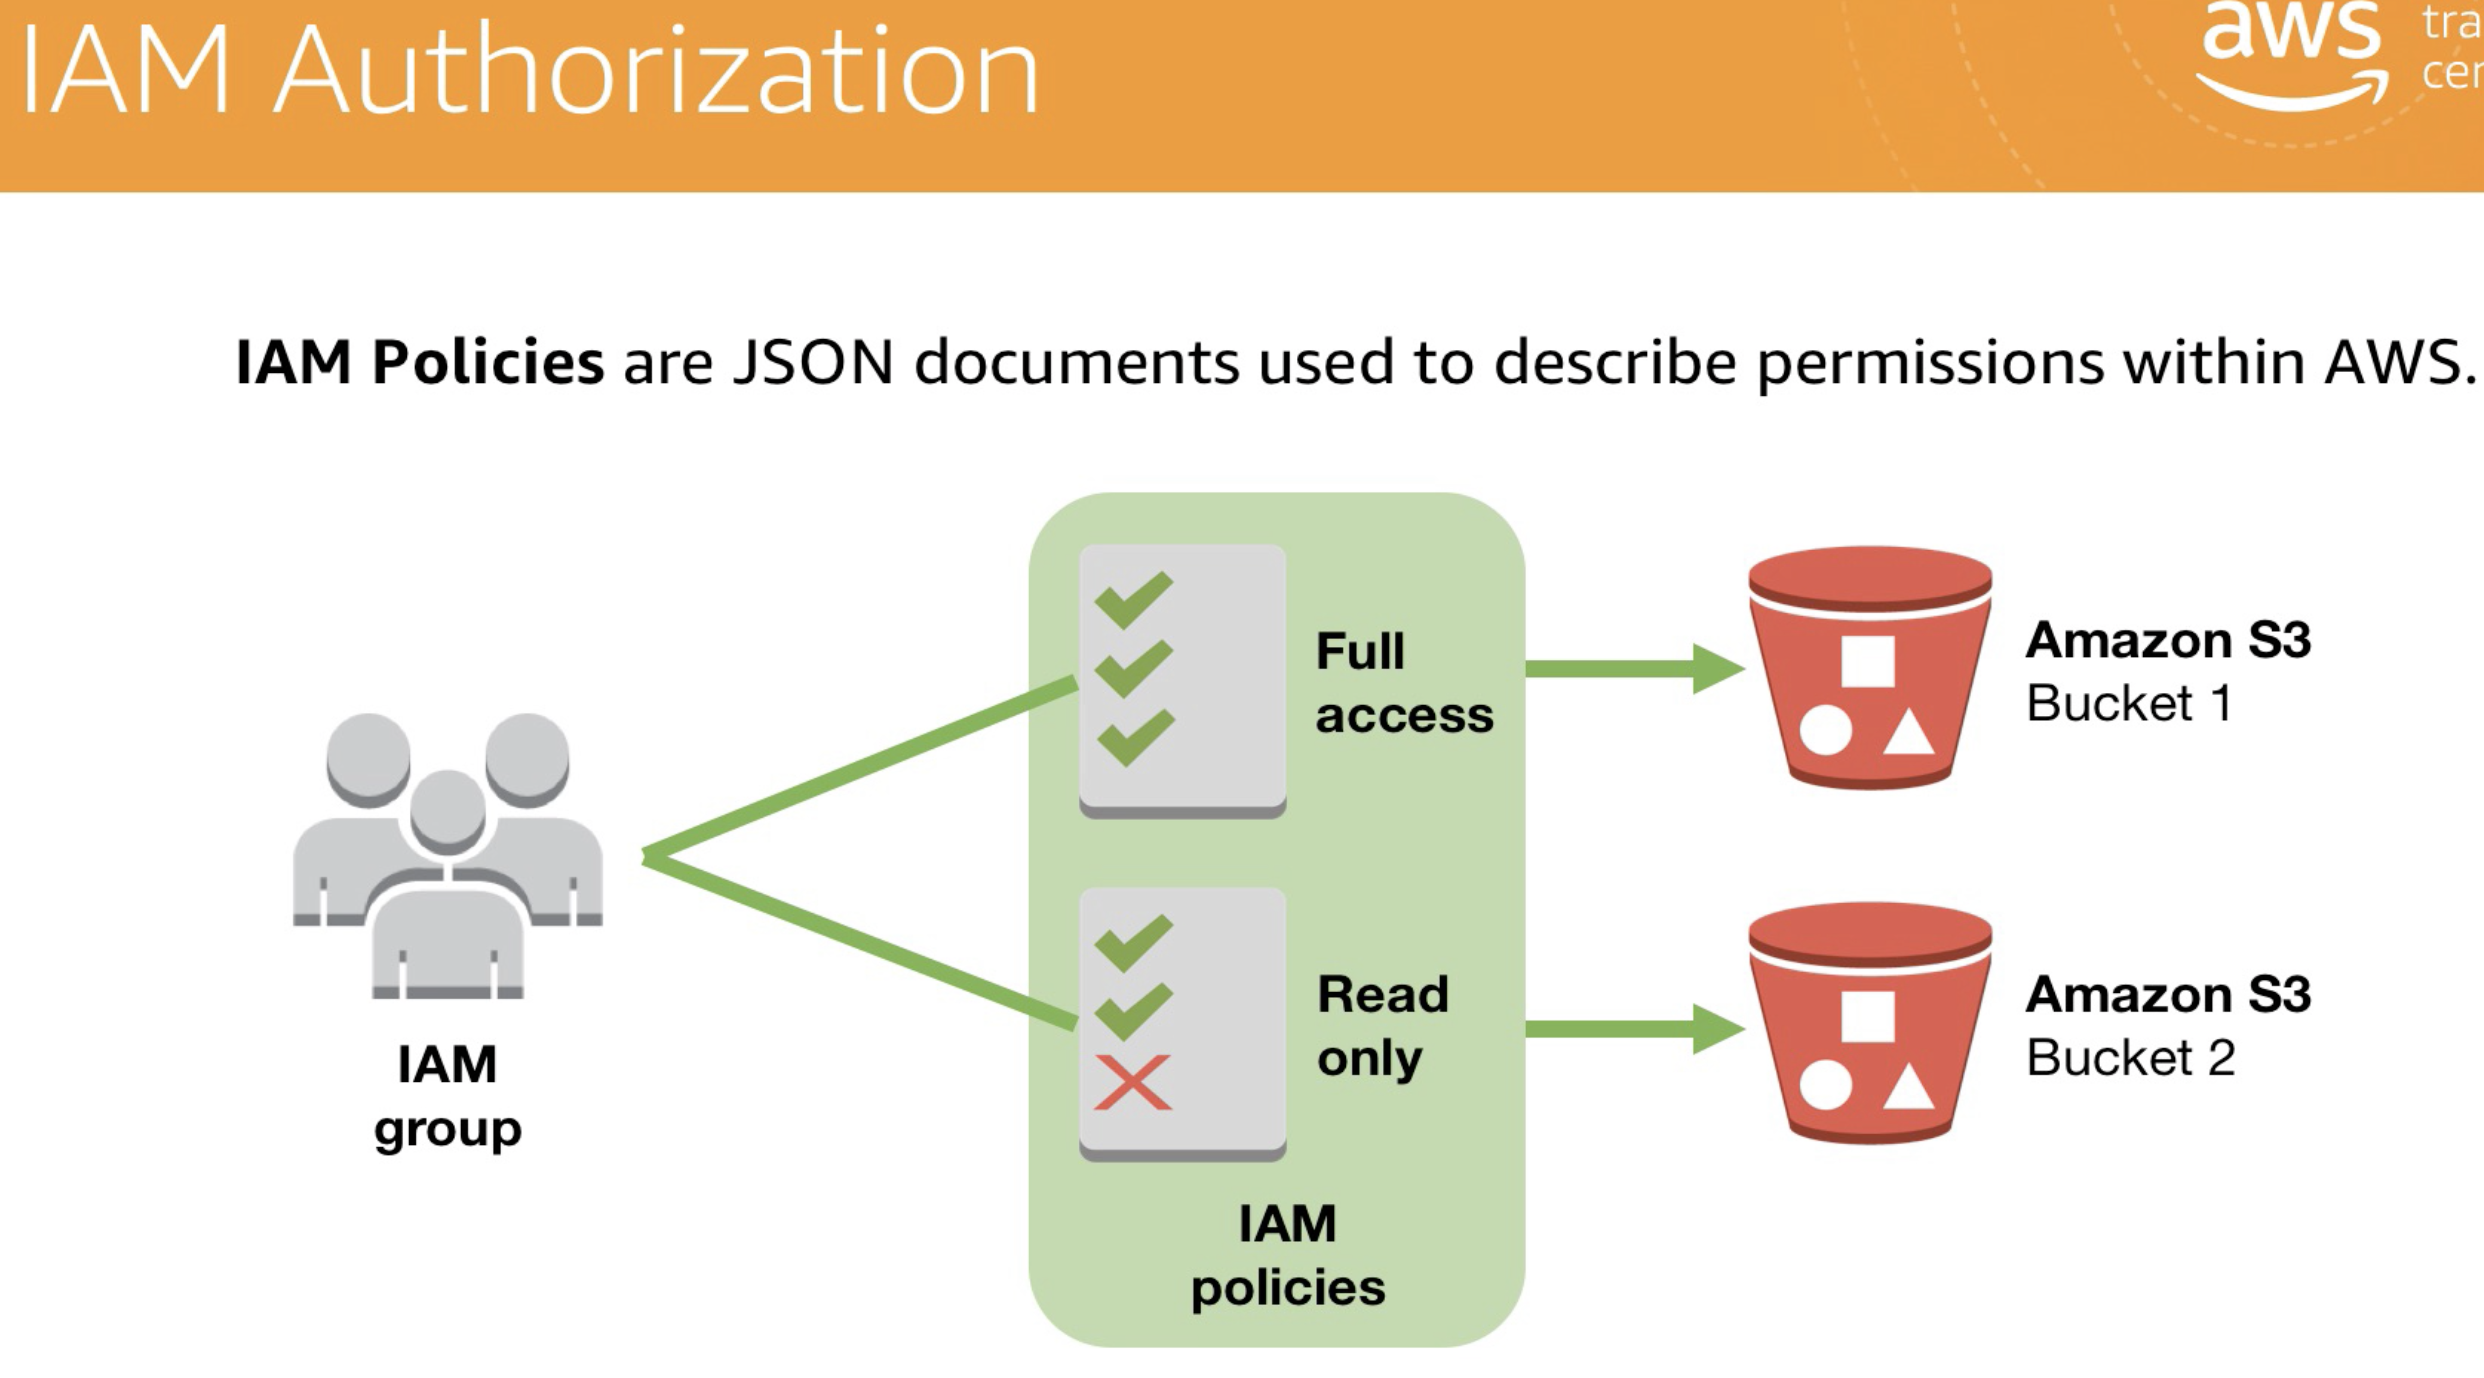
AWS Identity and Access Management (IAM) enables you to manage access to AWS services and resources securely. Using IAM, you can create and manage AWS users and groups, and use permissions to allow and deny their access to AWS resources. https://aws.amazon.com/iam/
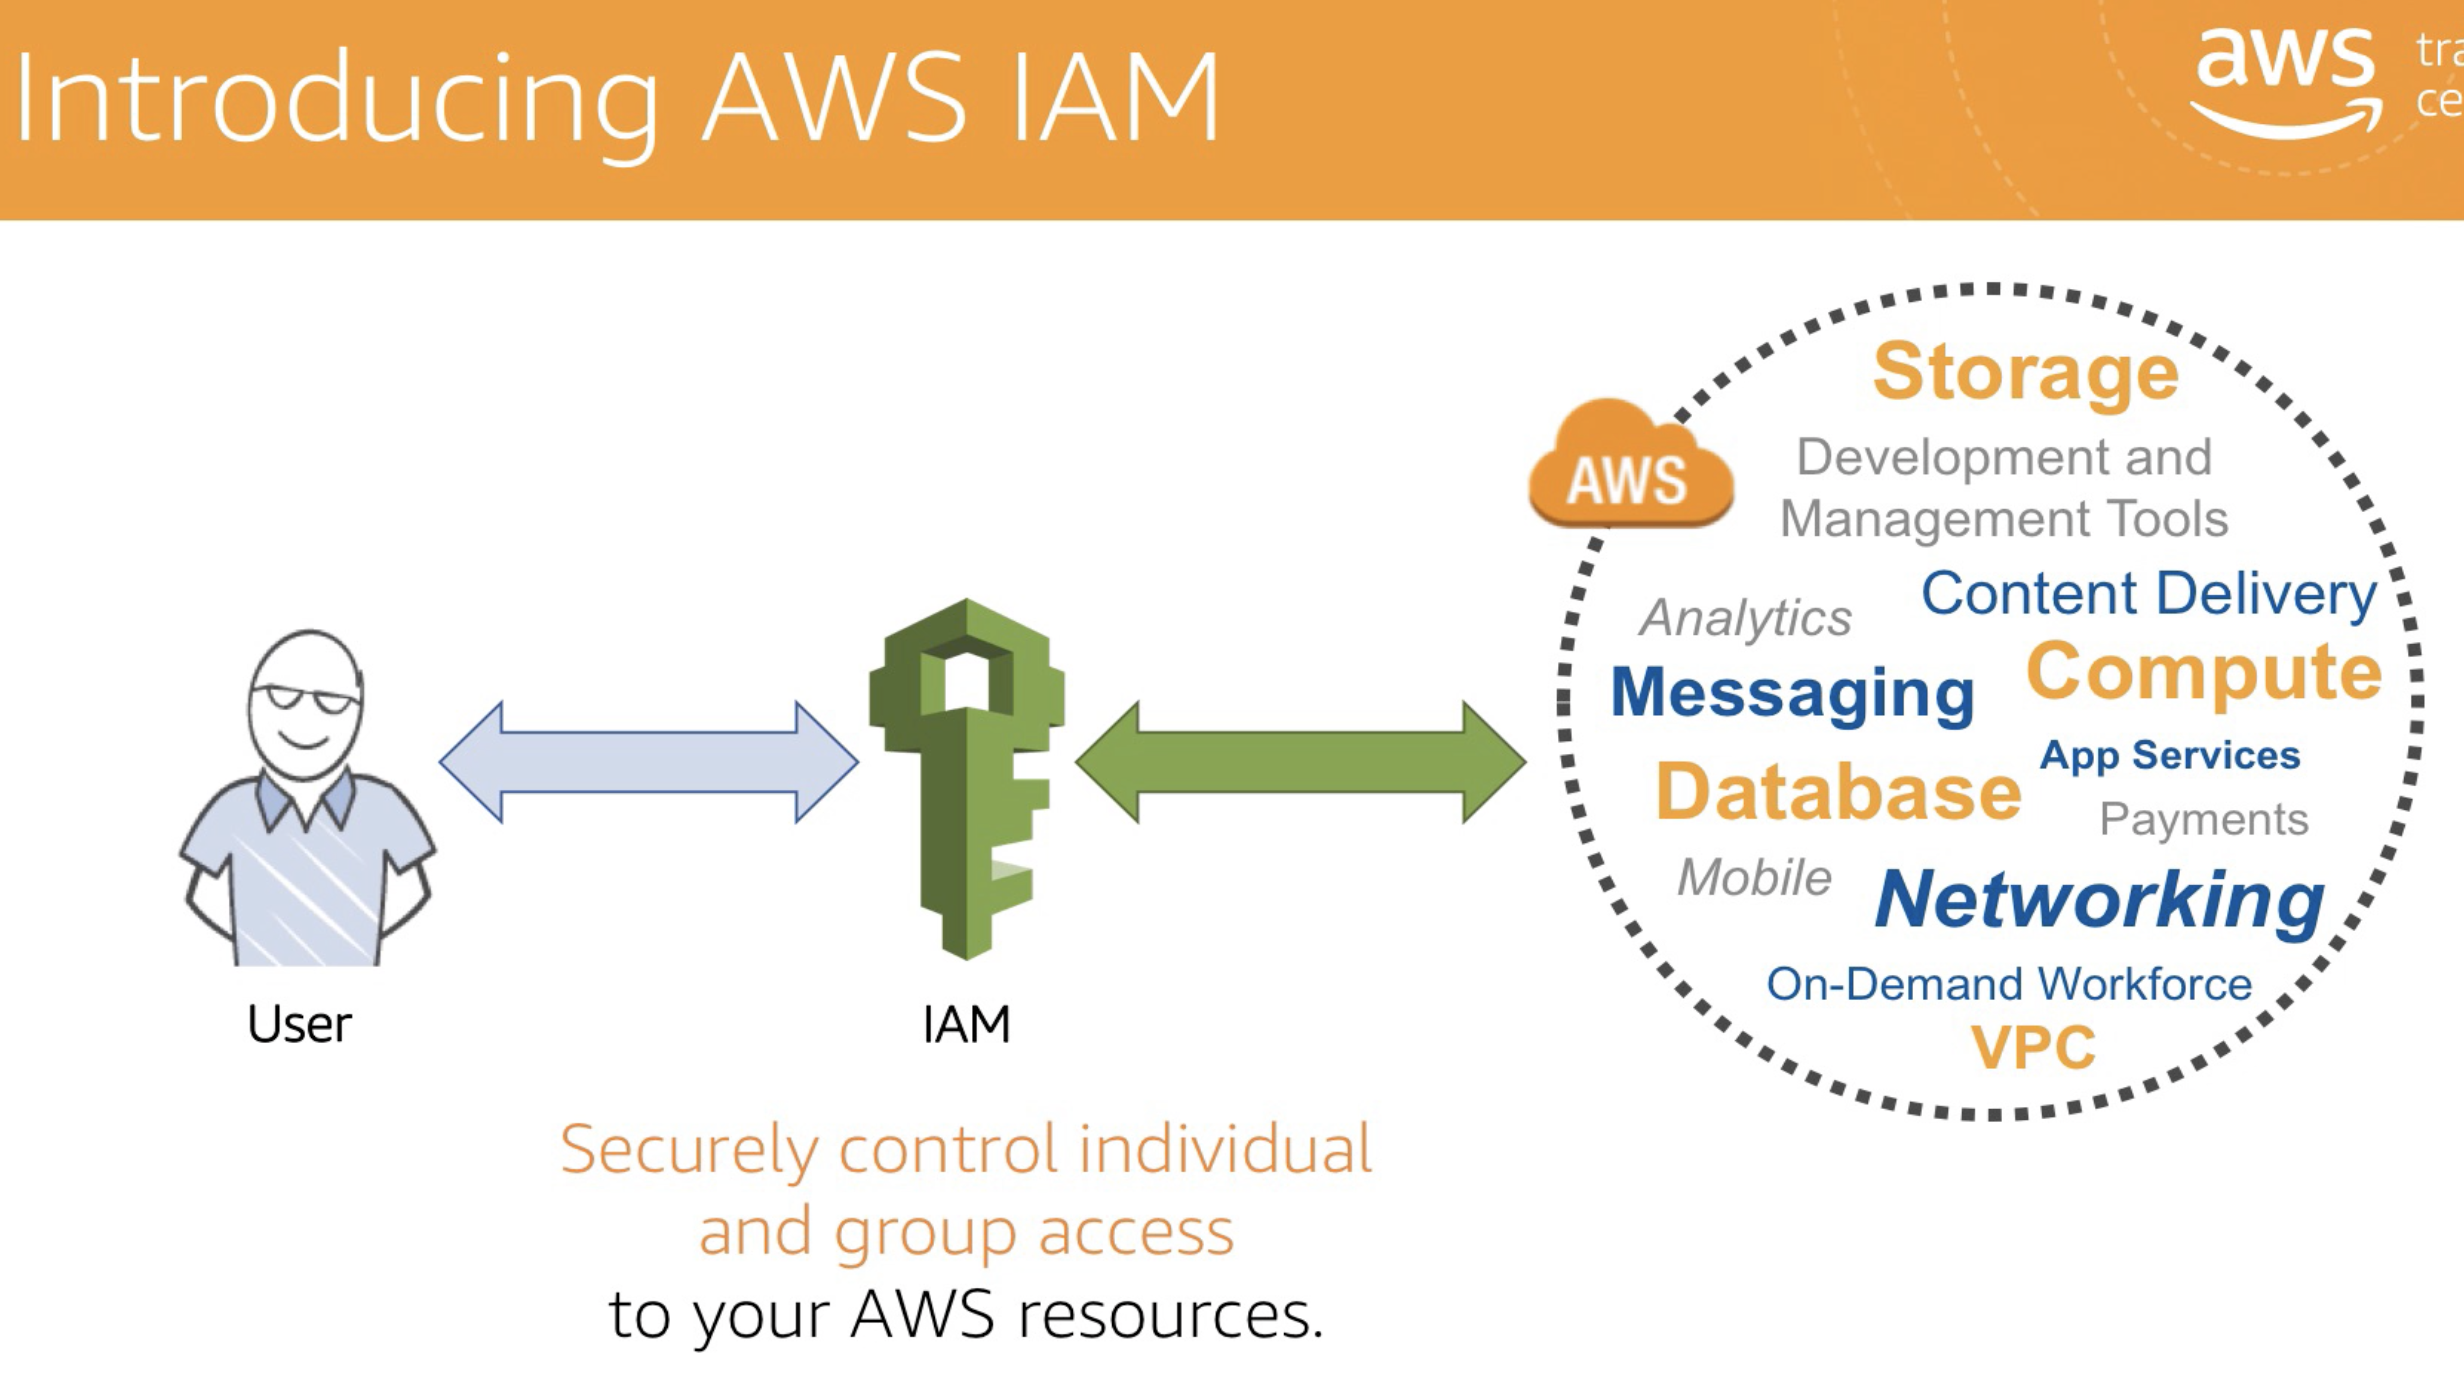
IAM 用于管理 IAM 用户访问 AWS 资源的权限控制。所谓 AWS 资源,就是 AWS 中的各种服务能力。
为什么是 IAM 用户,而不是账号。一般地,一个组织或是公司,AWS 主账号(AWS account root user)注册后,会创建 IAM user/group 并分配权限来进行日常管理工作。而不是直接使用 AWS 主账号,这样安全风险是比较大的,一个组织内全用一个账号是不合理的。
IAM 重要概念
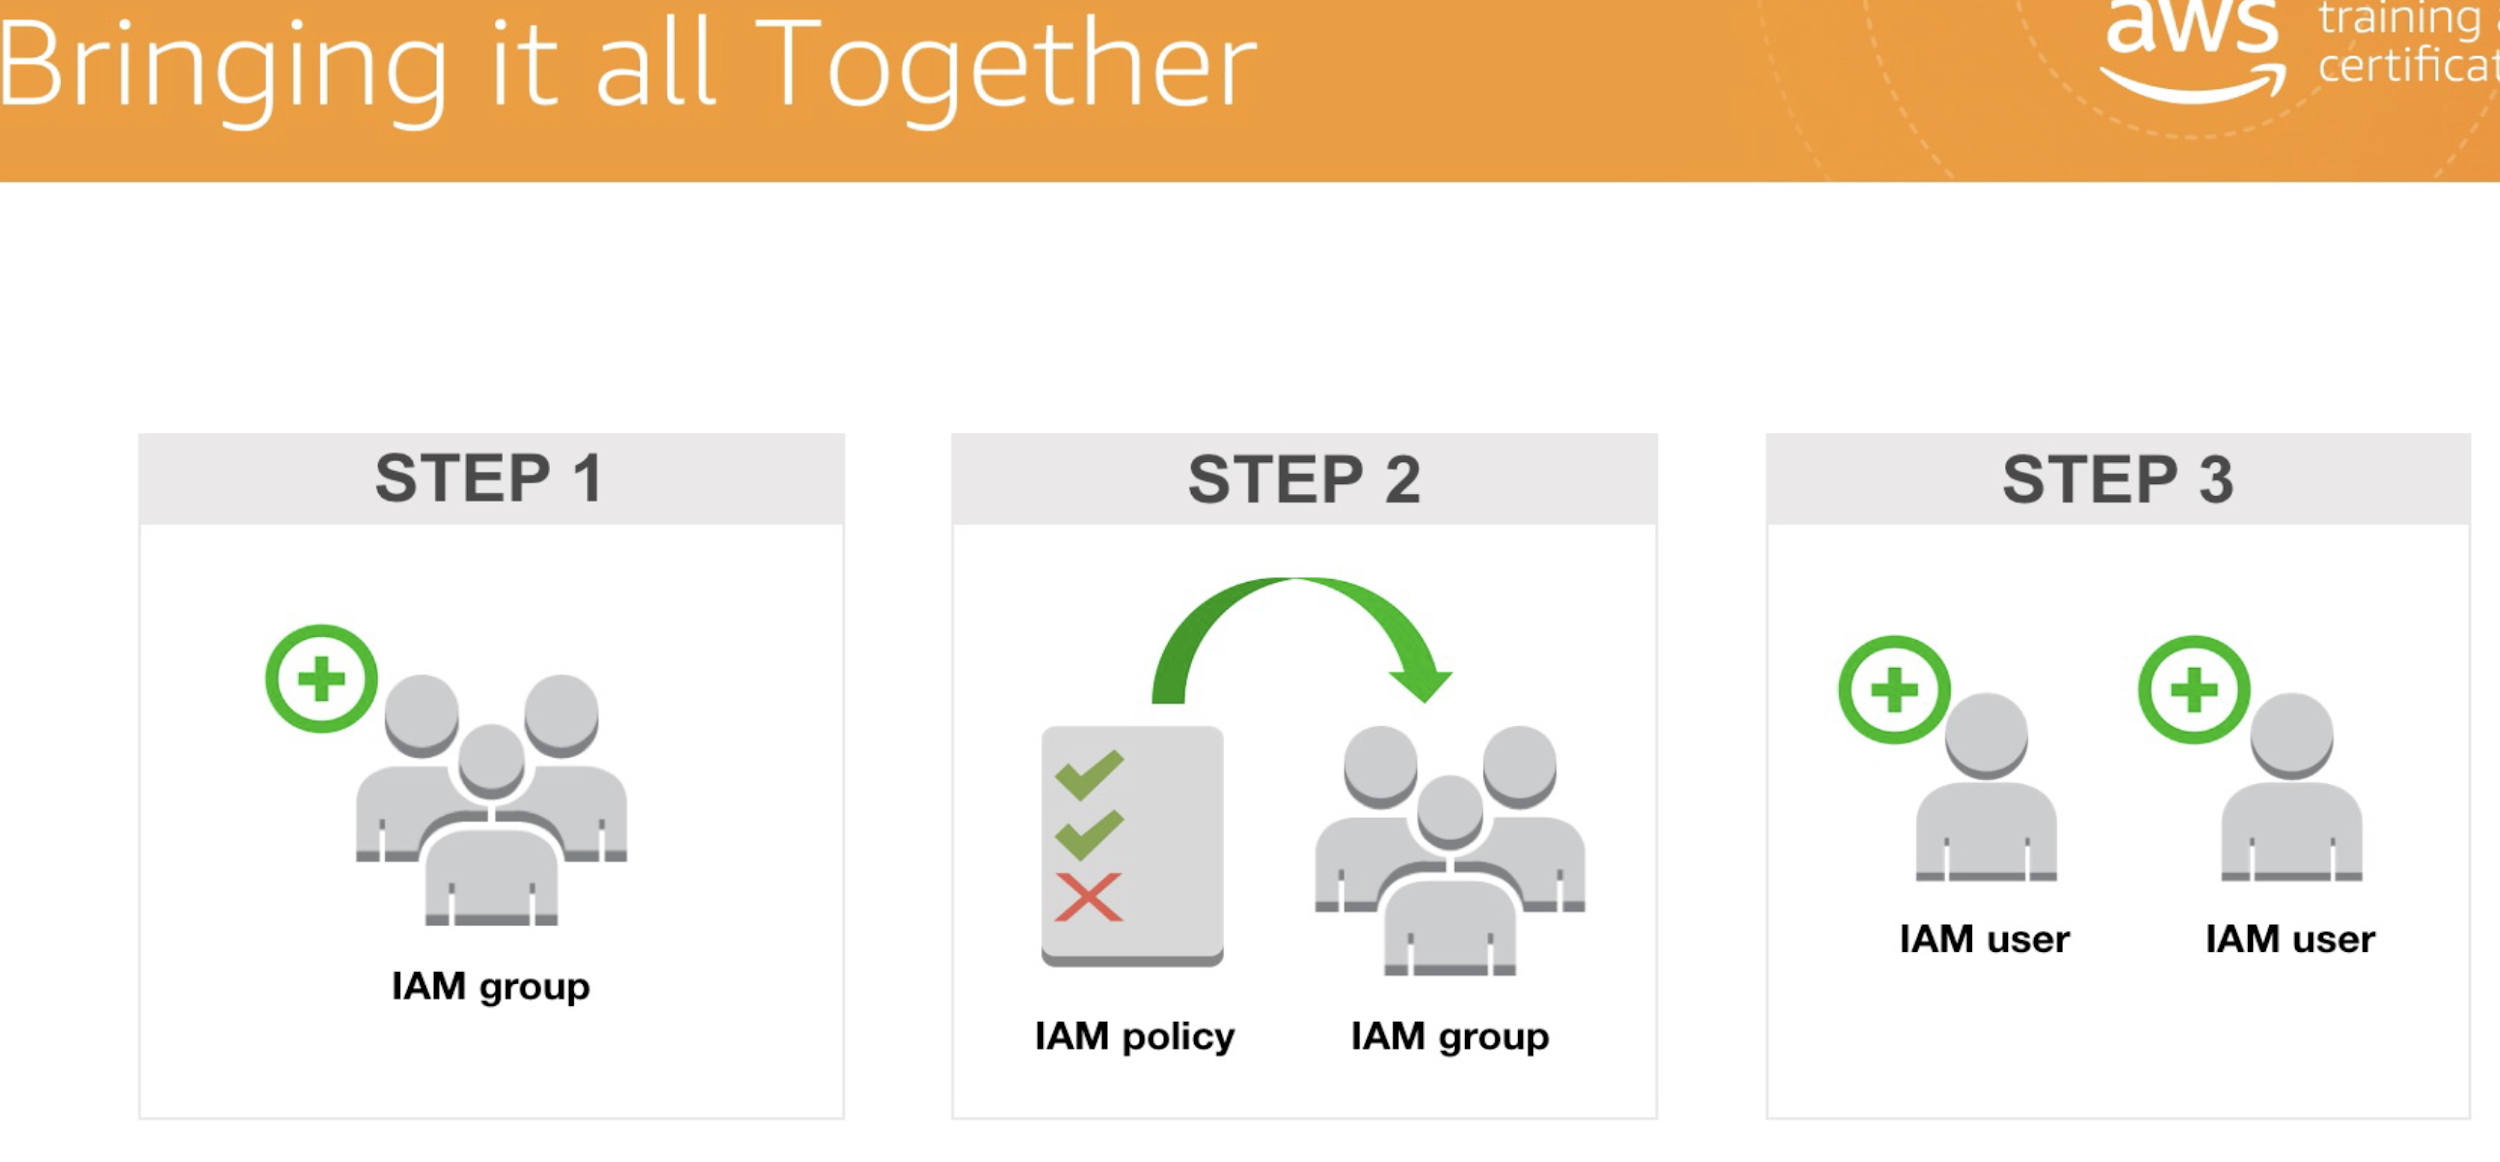
- IAM policy:访问权限规则,也就是对 AWS 资源的操作权限。可以赋予给 user/group/role。
- IAM user:用户。可以加入 group 间接得到 policy(建议,便于管理),也可以直接配置得到 policy。
- IAM group:用户组。可以把相同职能属性的 user 分为一个 group。
- IAM role:role 被直接赋予 user 或是通过 group 间接赋予 user,只代表 user 可以承担(assume)这个 role。user 使用 role 上的权限,需要有 assume role 的操作。


如果把 IAM group 比作是 role 的话,IAM 也是 RBAC 模型。
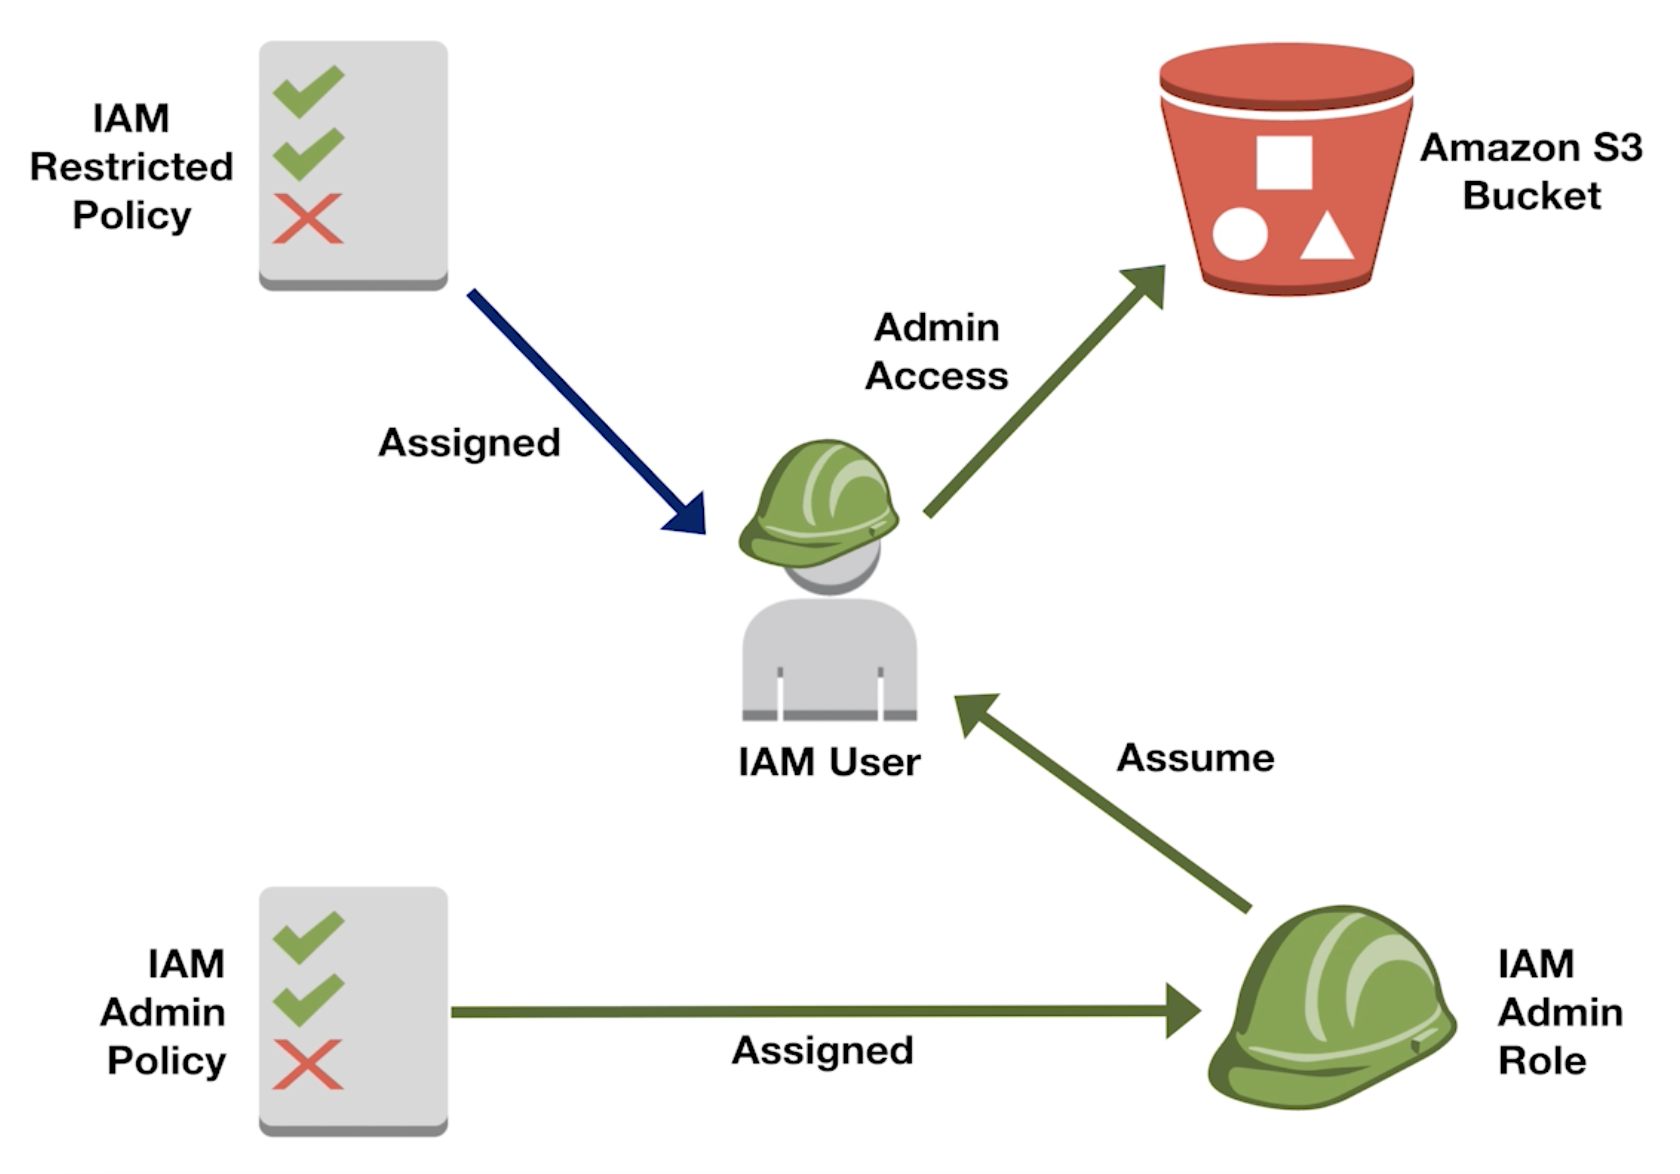
一个 role 的例子。一个 IAM user 被赋予了对 S3 受限的权限,比如说只能读。
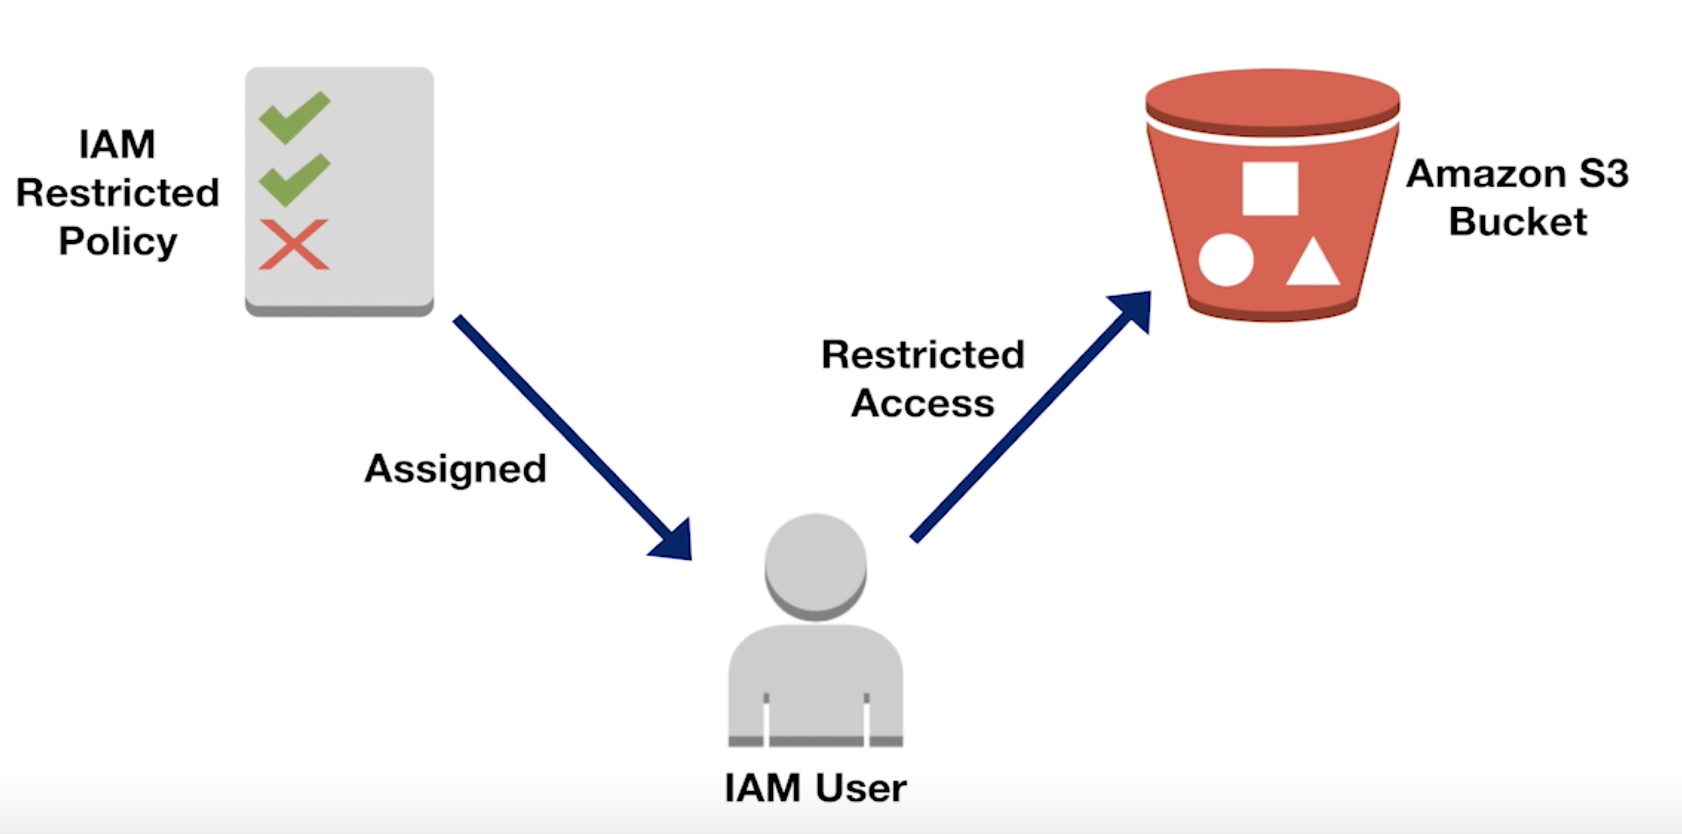
一个受限制的用户,被赋予了IAM Admin Role (Role本身被赋予了有 Admin 权限的 policy)之后,就有了不受限制的权限了。
aws-iam-authenticator 模块
EKS 默认安装。
通过 aws-iam-authenticator 这个模块,我们可以使用 IAM user 或是 assume IAM role 来登录 EKS 集群。
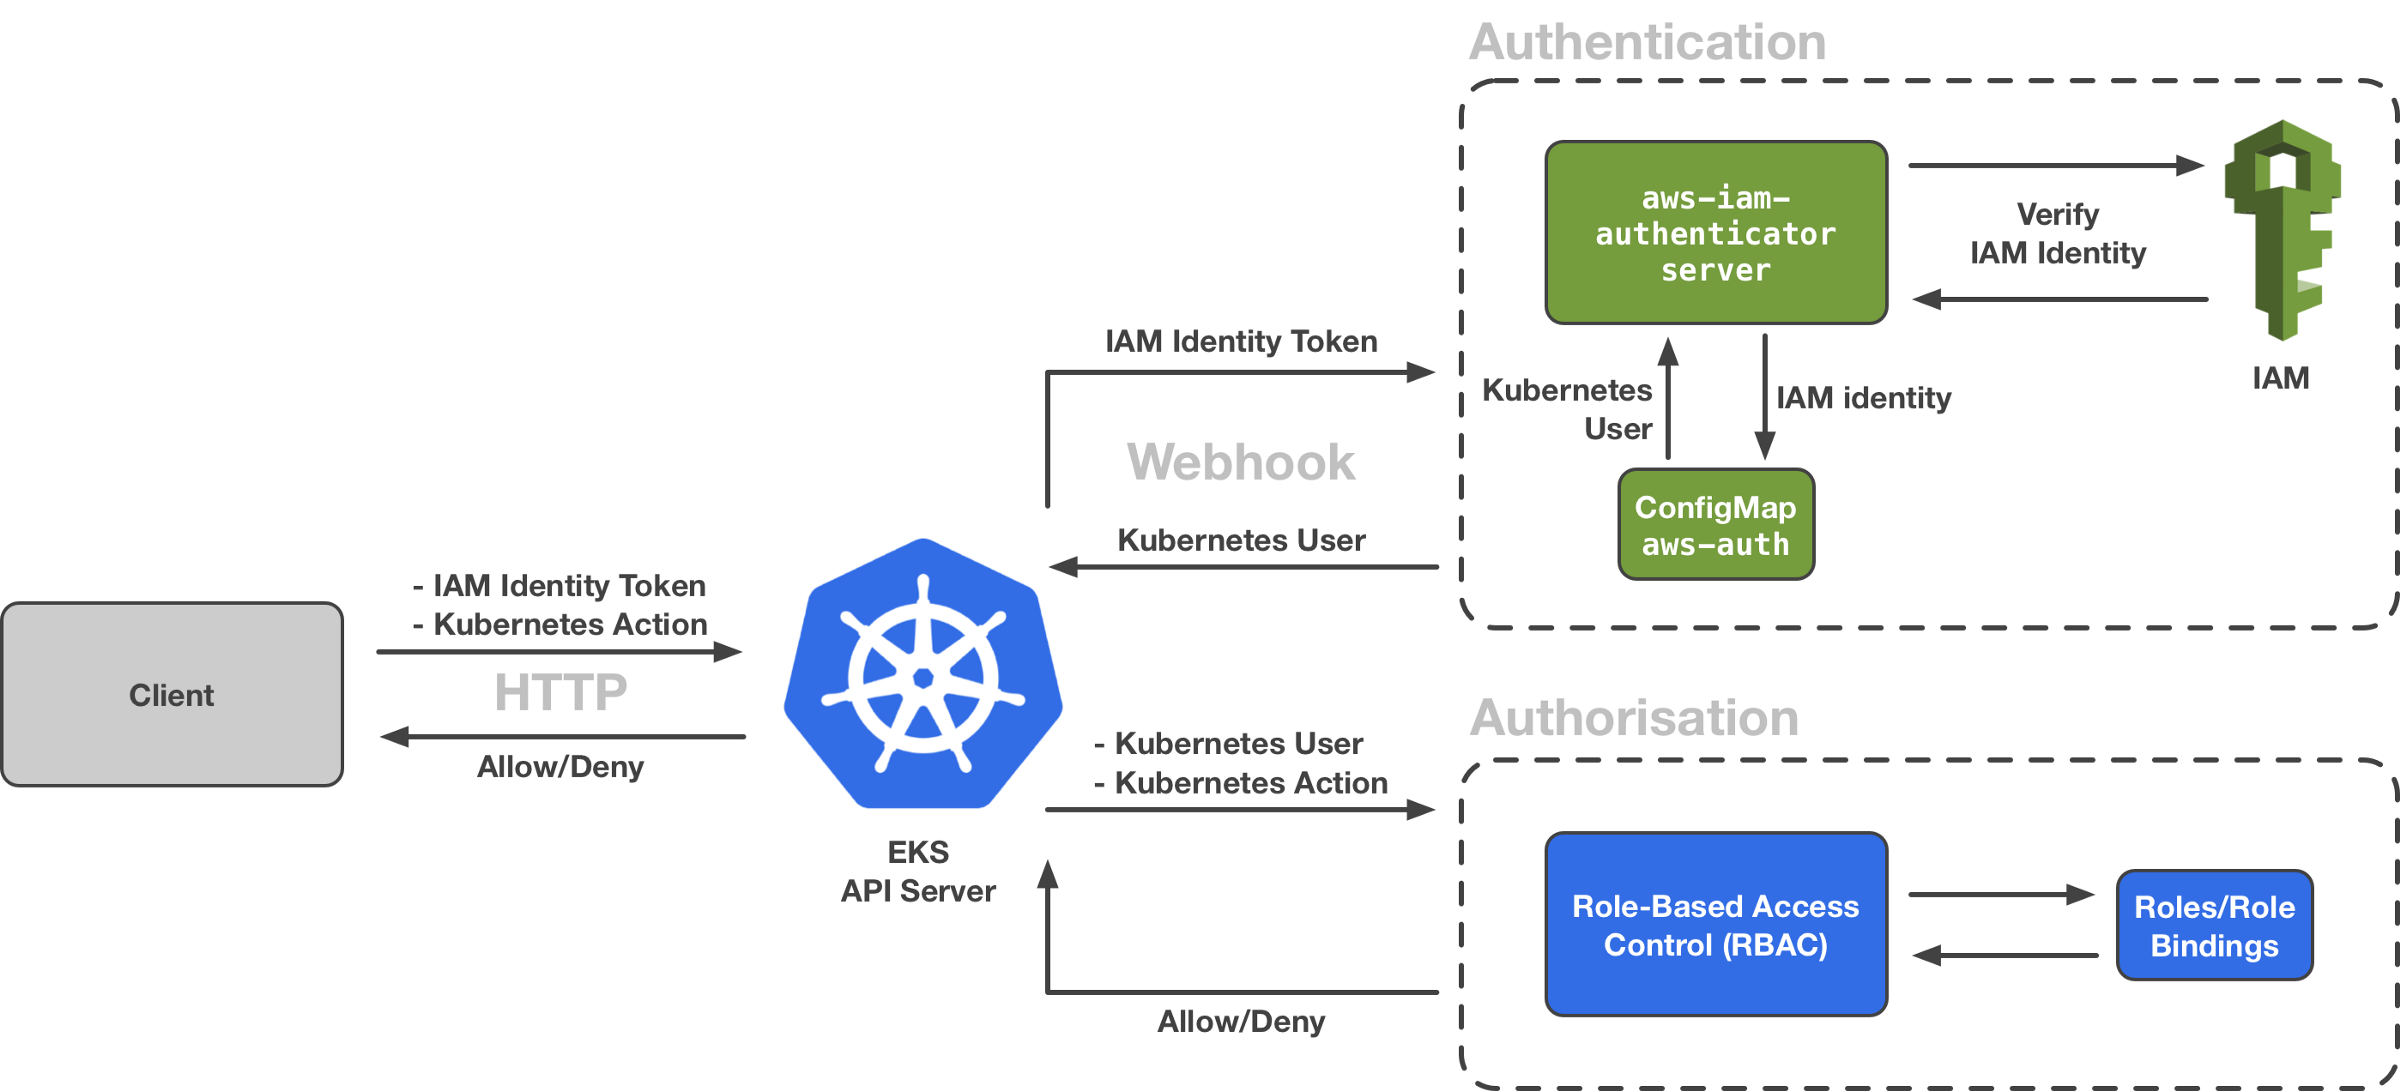
以 kubectl get pods 为例细细梳理整个流程:
- kubectl 调用 aws 或是 aws-iam-authenticator 命令行获取 IAM Identity Token。这个在图中没有体现,大体是 aws cmd <– aws access key/secret –> IAM。
- kubectl 带着 token 和 get pods 这个 action 请求 apiserver。这就是 Client -> EKS API Server 部分。
- apiserver 使用 token 进行 Authentication。EKS API Server 是配置了 webhook 的方式调用 aws-iam-authenticator server。
- aws-iam-authenticator server 连接 IAM 服务进行 token 验证。验证通过后,得到 IAM Identity,也就是 IAM user/role。
- aws-iam-authenticator server 获取 IAM Identity 对应的 Kubernetes user。
- Authentication 环节结束,得到 Kubernetes user。
- 其中,aws-iam-authenticator server 使用 aws-auth 这个 ConfigMap 存储 IAM Identity 与 Kubernetes user 的映射关系。
- 其中,aws-iam-authenticator server 是安装在 master node 上。
- apiserver 使用 Authentication 环节得到的 Kubernetes user 和请求中的 action,也就是 get pods 进入 Authorization 环节。
- 具体地说,get pods,pods 是 API Resource,get 是 action。
- 获取与 Kubernetes user 绑定的 Role,检查用户是否有权限操作 get pods。
- Authorization 环节通过,也就是权限验证通过,笼统地说,apiserver 就会把 pods 资源返回给客户端了。
我们已经知道了 configmap/aws-auth 维护了 Kubernetes user 与 IAM user/role 的映射关系。一个一个用户添加不是个好办法,建议直接映射 IAM role。使用 mapRoles,而不是 mapUsers。
The Advantage of using Role to access the cluster instead of specifying directly IAM users is that it will be easier to manage: we won’t have to update the ConfigMap each time we want to add or remove users, we will just need to add or remove users from the IAM Group and we just configure the ConfigMap to allow the IAM Role associated to the IAM Group.
值得说明,创建 EKS cluster 的 IAM 实体,自动被赋予 system:masters 的权限,也就是集群管理员的权限。
When you create an Amazon EKS cluster, the IAM entity user or role, such as a federated user that creates the cluster, is automatically granted system:masters permissions in the cluster’s RBAC configuration in the control plane. This IAM entity does not appear in the ConfigMap, or any other visible configuration, so make sure to keep track of which IAM entity originally created the cluster. To grant additional AWS users or roles the ability to interact with your cluster, you must edit the aws-auth ConfigMap within Kubernetes.
实战
我们分三个组:
- admin 管理员权限。
- integration 一个或多个 namespace 的写权限,用于例行变更部署。
- developer 一个或多个 namespace 的读权限,用于查看 dashboard,查看容器日志,排查一般问题。
改动效果
需要操作修改的地方有:
- IAM 下创建三个 group,每个 group 对应一个 role。user 可以按需创建,加入合适的 group 中。
- aws-auth 这个 configmap 更新。
- RBAC 配置。
IAM
IAM 控制台可见:

group 与 role 关联。
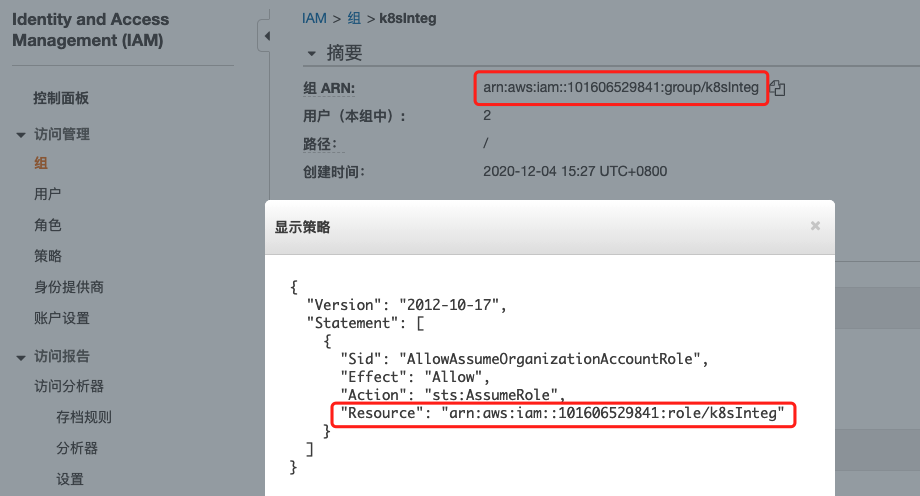
每个 group 都有对应的 role。这个 role 用于映射到 Kubernetes user。

aws-auth
aws-auth 应该有如下三项:rolearn 从 IAM 获取,username 自定义,与后面的 RBAC 权限控制保持一致即可。
$ kubectl get cm -n kube-system aws-auth -o yaml

apiVersion: v1
data:
  mapRoles: |
...
    - rolearn: arn:aws:iam::xxxxxx:role/k8sDev
      username: dev-user
    - rolearn: arn:aws:iam::xxxxxx:role/k8sInteg
      username: integ-user
    - groups:
      - system:masters
      rolearn: arn:aws:iam::xxxxxx:role/k8sAdmin
      username: admin
...
  mapUsers: |
    []
kind: ConfigMap
...
RBAC
kind: RoleBinding
apiVersion: rbac.authorization.k8s.io/v1beta1
metadata:
  name: dev-role-binding
  namespace: evonet
subjects:
- kind: User
  name: dev-user
roleRef:
  kind: ClusterRole
  name: view
  apiGroup: rbac.authorization.k8s.io
kind: RoleBinding
apiVersion: rbac.authorization.k8s.io/v1beta1
metadata:
  name: integ-role-binding
  namespace: evonet
subjects:
- kind: User
  name: integ-user
roleRef:
  kind: ClusterRole
  name: edit
  apiGroup: rbac.authorization.k8s.io
过程
参考:Using IAM Groups to manage Kubernetes access
按需,略有改动。
本地配置使用
主要是创建或是修改几个文件:
- ~/.aws/config
- ~/.aws/credentials
- ~/.kube/config (使用 export KUBECONFIG=</your/path/to/kubeconfig> 暴露环境变量可使用任意位置)
注意:以上都是软件默认配置路径。
- 替换以下的 <aws_access_key_id> <aws_secret_access_key>。
- 如果是 admin role:role_arn替换为 arn:aws:iam::xxxxxx:role/k8sAdmin
- 如果是 integ role:role_arn=arn:aws:iam::xxxxxx:role/k8sInteg
$ cat ~/.aws/config
[default]
role_arn=arn:aws:iam::101606529841:role/k8sDev
# role_arn=arn:aws:iam::101606529841:role/k8sInteg
source_profile=default

$ cat ~/.aws/credentials
[default]
aws_access_key_id = <aws_access_key_id>
aws_secret_access_key = <aws_secret_access_key>

$ cat ~/.kube/config
apiVersion: v1
clusters:
- cluster:
    certificate-authority-data: xxxxxx
    server: xxxxxx
  name: xxxxxx
contexts:
- context:
    cluster: xxxxxx
    user: xxxxxx
  name: xxxxxx
current-context: xxxxxx
kind: Config
preferences: {}
users:
- name: xxxxxx
  user:
    exec:
      apiVersion: client.authentication.k8s.io/v1alpha1
      args:
      - --region
      - ap-northeast-1
      - eks
      - get-token
      - --cluster-name
      - eks-try-2020-2
      command: aws
aws 配置是关键。
role_arn 一定要指定,然后 role_arn 也是需要 source_profile 的,两者都指定下即可。
也就是说,role 的使用一定要显式地使用。如果不显式,默认就是没有role,没有权限,非 cluster 创建者,就没有权限去访问了。
aws cli 的配置文件,得参考如下。
- Configuration basics - AWS Command Line Interface
- 查看下配置 Configuration and credential file settings - AWS Command Line Interface
- named profile,这里我们使用 default profile 即可,不需要指定 profile。 https://docs.aws.amazon.com/cli/latest/userguide/cli-configure-profiles.html
- 使用 IAM role https://docs.aws.amazon.com/cli/latest/userguide/cli-configure-role.html
kubeconfig 使用默认生成的即可。credentials 也可以使用 aws configure 来设置认证信息。只要新增 role_arn 即可。应该是最简设置了。
参考
- Controlling Access to the Kubernetes API
- Authenticating
- kubernetes-sigs/aws-iam-authenticator: A tool to use AWS IAM credentials to authenticate to a Kubernetes cluster
- How to Deeply Understand the Implementation Mechanism of EKS IAM Authenticator
- IAM user 映射为 Kubernetes user Intro to RBAC
- IAM group/role 映射为 Kubernetes user Using IAM Groups to manage Kubernetes access
- Create a kubeconfig for Amazon EKS https://docs.aws.amazon.com/eks/latest/userguide/create-kubeconfig.html#create-kubeconfig-automatically
- Using IAM Groups to manage Kubernetes access
- Managing users or IAM roles for your cluster - Amazon EKS 是上面那个 tutorial 的浓缩版
- https://docs.aws.amazon.com/IAM/latest/UserGuide/introduction.html
