Fluentd 实战——收集 Docker 容器日志

以收集Docker容器日志的例子,介绍下Fluentd的用法。不考虑logstash,太占服务器资源了。

安装 Fluentd

Ubuntu 18.04上的安装命令(https://docs.fluentd.org/installation/install-by-deb):

root@ubuntu-parallel:~# curl -L https://toolbelt.treasuredata.com/sh/install-ubuntu-bionic-td-agent3.sh | sh

以Daemon方式启动:

root@ubuntu-parallel:~# systemctl start td-agent.service
root@ubuntu-parallel:~# systemctl status td-agent.service

fluentd的安装目录是在/opt/td-agent/下的。为演示方便,我们可以直接使用 /opt/td-agent/embedded/bin/fluentd这个程序。

root@ubuntu-parallel:~# ps -ef | grep fluentd
td-agent 30596     1  0 17:10 ?        00:00:00 /opt/td-agent/embedded/bin/ruby /opt/td-agent/embedded/bin/fluentd --log /var/log/td-agent/td-agent.log --daemon /var/run/td-agent/td-agent.pid
td-agent 30602 30596  9 17:10 ?        00:00:00 /opt/td-agent/embedded/bin/ruby -Eascii-8bit:ascii-8bit /opt/td-agent/embedded/bin/fluentd --log /var/log/td-agent/td-agent.log --daemon /var/run/td-agent/td-agent.pid --under-supervisor

其他系统的安装参考:https://docs.fluentd.org/installation

小试牛刀

配置文件 test.conf,启动一个HTTP服务,并把接收到的日志,打印到标准输出。

<source>
  @type http
  port 9880
</source>

<match *.*>
  @type stdout
</match>

启动fluentd进程。

root@ubuntu-parallel:~# /opt/td-agent/embedded/bin/fluentd -c test.conf

通过HTTP服务提交日志。可以看到fluentd终端打印出了输入的日志。
Google Vision API

目标

业务上需要识别出文本、图像敏感内容,降低业务风险。

调用下云服务的产品。

Google Cloud Platform

GCP上,图像识别有两个产品:

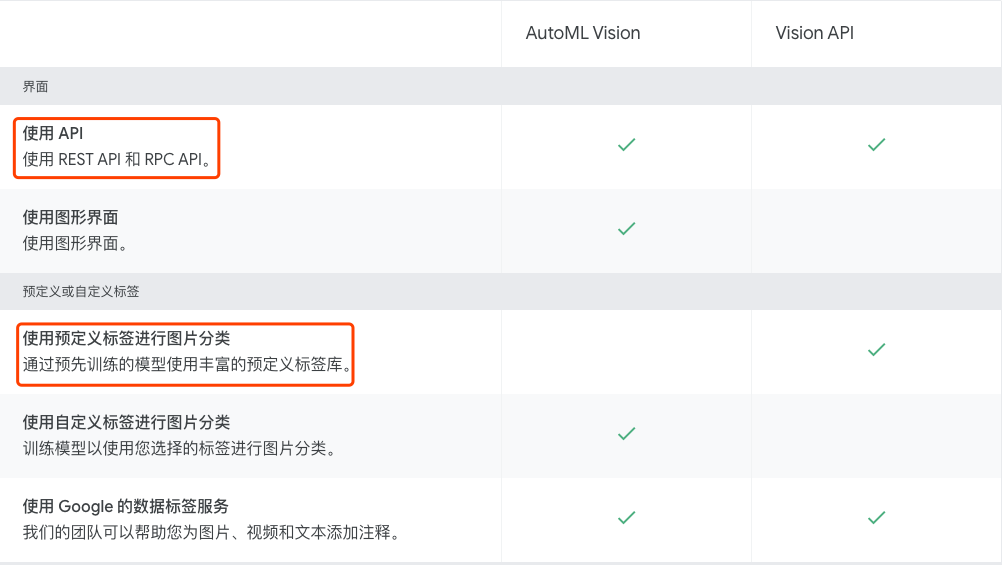
  1. Vision API 直接使用预先训练的模型
  2. AutoML 迁移学习,使用用户提交的新分类数据,训练模型。

关于文本识别的产品是类似的,也分直接使用预训练模型和迁移学习重新训练。

Vision API:图像内容识别

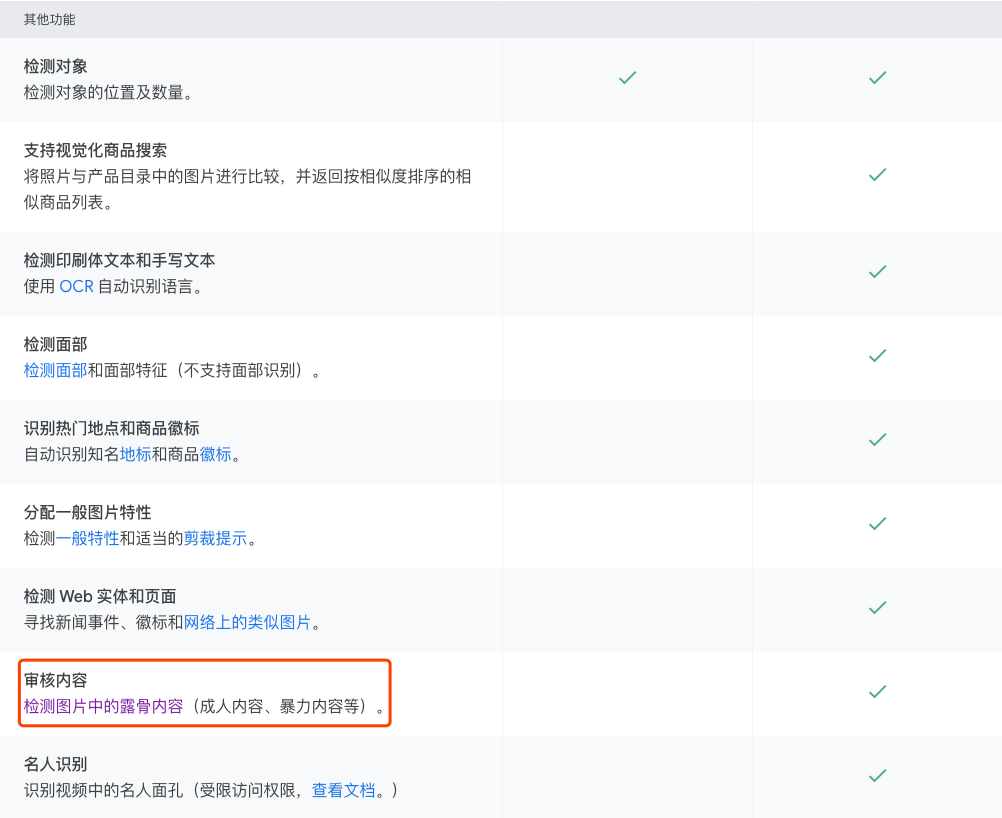
  1. Google Vision API的模型已经有审核内容的能力:暴力、成人内容的识别。
  2. 提供API,也提供了各个语言的SDK。
  3. 不需要开发者训练模型。

../../images/image-20200401145549783.png

../../images/image-20200401145658730.png

参考:https://cloud.google.com/vision?hl=zh-cn

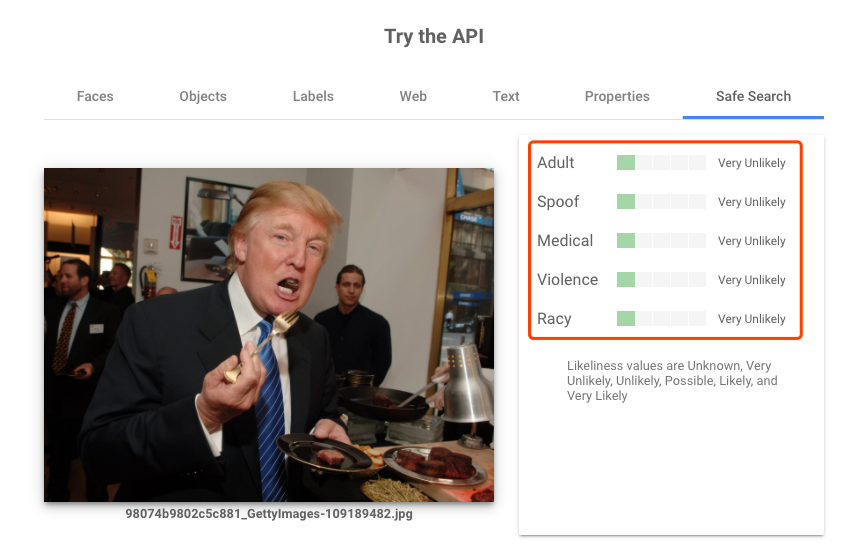
试用

../../images/image-20200401142058025.png

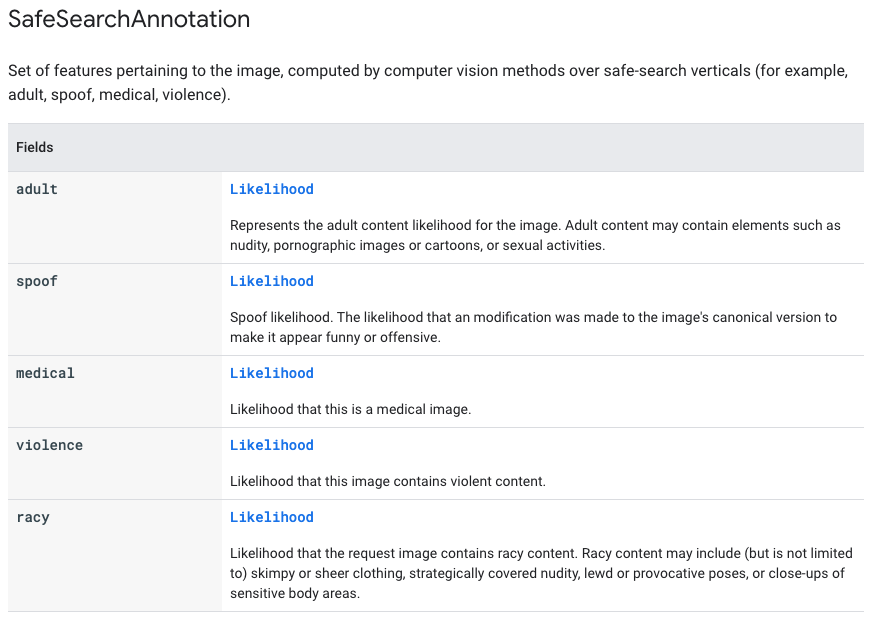
安全搜索的分类说明

../../images/image-20200401144423857.png

  1. Adult 成人内容
  2. Spoof 恶搞,比如恶搞政治人物
  3. Medical 医疗影像
  4. Violence 暴力内容
  5. Racy 猥亵类,类似成人内容

参考:https://cloud.google.com/vision/docs/reference/rpc/google.cloud.vision.v1?hl=zh-cn#google.cloud.vision.v1.SafeSearchAnnotation

使用 Docker Machine

简介

Docker Machine lets you create Docker hosts on your computer, on cloud providers, and inside your own data center. It creates servers, installs Docker on them, then configures the Docker client to talk to them.

参考:

  1. https://github.com/docker/machine
  2. https://docs.docker.com/machine/overview/

../../images/machine.png

vs. Vagrant

与Vagrant的交集

目前使用 Vagrant 搭 Docker 环境的步骤如下:

  1. vagrant init {box_name},下载一个基础的虚拟机镜像,比如centos,并创建一个Vagrantfile。
  2. Vagrantfile中设置虚拟机hostname。
  3. Vagrantfile中设置Private network,使得几个VM可以互相通信。
  4. VM内安装docker软件。

如果用上了docker-machine,只要一行命令。在这个场景上,docker-machine 比 Vagrant 方便了很多。

Docker Network小结

Docker网络非常值得学习。对Docker不熟的同学,建议先看一些入门资料。

Docker 学习资料

  1. Docker — 从入门到实践 https://www.yuque.com/grasilife/docker
  2. Docker Kubernetes Lab Handbook https://docker-k8s-lab.readthedocs.io/en/latest/index.html
  3. 「Docker进阶与实战」华为Docker实践小组

单机网络

(建议在Linux系统上实验。)

Docker安装完后,默认有三个(三种)网络。分别是默认的bridge模式,host模式,none模式。

# docker network ls
NETWORK ID          NAME                DRIVER              SCOPE
51cbe7a9bb19        bridge              bridge              local
7182ef9fa8c4        host                host                local
bd80d0dedaa8        none                null                local

参考:https://docs.docker.com/network/

none模式 –net=none

无网络。

# docker run --net=none --rm -it alpine ip addr show
1: lo: <LOOPBACK,UP,LOWER_UP> mtu 65536 qdisc noqueue state UNKNOWN qlen 1000
    link/loopback 00:00:00:00:00:00 brd 00:00:00:00:00:00
    inet 127.0.0.1/8 scope host lo
       valid_lft forever preferred_lft forever

host模式 –net=host

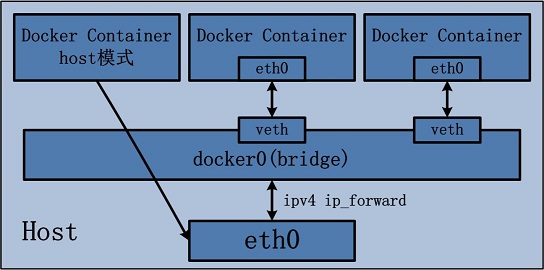
  1. 容器共用宿主机的网络。但是,容器的其他方面,如文件系统、进程列表等还是和宿主机隔离的。
  2. 容器不会申请独立的IP。
  3. 容器申请的端口占用宿主机的端口资源。
  4. -p等端口映射命令不起作用:WARNING: Published ports are discarded when using host network mode
  5. 性能上比较好,因为没有地址转换。Host mode networking can be useful to optimize performance, and in situations where a container needs to handle a large range of ports, as it does not require network address translation (NAT), and no “userland-proxy” is created for each port.
  6. Linux ONLY。The host networking driver only works on Linux hosts, and is not supported on Docker Desktop for Mac, Docker Desktop for Windows, or Docker EE for Windows Server.

../../images/907596-20170517105727775-430532496.jpg

Go Web 项目框架

常用开源库

依赖包管理 Go Modules

Go Modules。Go 从1.11版本开始支持,Go 1.14被认为是生产可用了。个人用过最方便的Go依赖包管理工具了。

版本管理中维护 go.mod/go.sum 两个文件。

../../images/image-20200320152954581.png

参考

  1. Using Go Modules https://blog.golang.org/using-go-modules

命令行框架 Corba

Corba。第一次看到,是在翻看 Hyperledger Fabric 的时候。

../../images/ad566232-814f-11e5-9cd0-aa101788c117.png

  1. 子命令,嵌套的子命令。
  2. 增强版本的flags。
  3. 项目模板的生成工具。
  4. 生成工具也自动引入了Viper这个包。Corba与Viper由一个作者开发,两个项目配合使用非常方便。

建议使用Cobra命令行工具生成项目模板。

  ▾ appName/
    ▾ cmd/
        add.go
        your.go
        commands.go
        here.go
      main.go

参考

  1. A Commander for modern Go CLI interactions https://github.com/spf13/cobra
  2. Cobra Generator https://github.com/spf13/cobra/blob/master/cobra/README.md

配置管理 Viper

Viper。常常与Corba搭配使用。抄一段官方简介:

Go库对URL Path中%2F的处理

问题描述

  1. 有同事反馈Go项目的接口404了。看了下nginx日志,只有部分请求404了,404请求的显著特征是URL里有%2F,也就是/的转义。
  2. 接口定义是这样的:/api/xxx/{mid}/{uid}。mid、uid是URL path的一部分。从现象来看,程序没处理好转义字符,因为多了一个path部分,路由不匹配了,404。
  3. nginx的URL记录是%2F,其实调用方传的是微信ID,比如IEd5W/jqsdF9qpuagQscEg==。调用方在发请求之前对ID已经做好了转义。

Go内置库:不区分%2F/

An application cannot distinguish between “/” used as a path segment delimiter and “/” encoded in a path segment.

这个问题由来已久了,看着官方也不打算解决了,见这个issue:https://github.com/golang/go/issues/3659

If your app needs to assign special meaning, the
server can reprocess req.RequestURI as it sees fit, and the client can
issue requests using &url.URL{Opaque: rawURI}.
  1. reprocess req.RequestURI 就是让你别用内置路由库了。
  2. issue requests using &url.URL{Opaque: rawURI}. 试了,问题没解决。客户端不管怎么做,最终都是以HTTP协议输出的。GET http://www.google.com/index.html HTTP/1.1 服务端代码最终解析的还是中间的那段URL文本。照理就不通啊。

源码角度

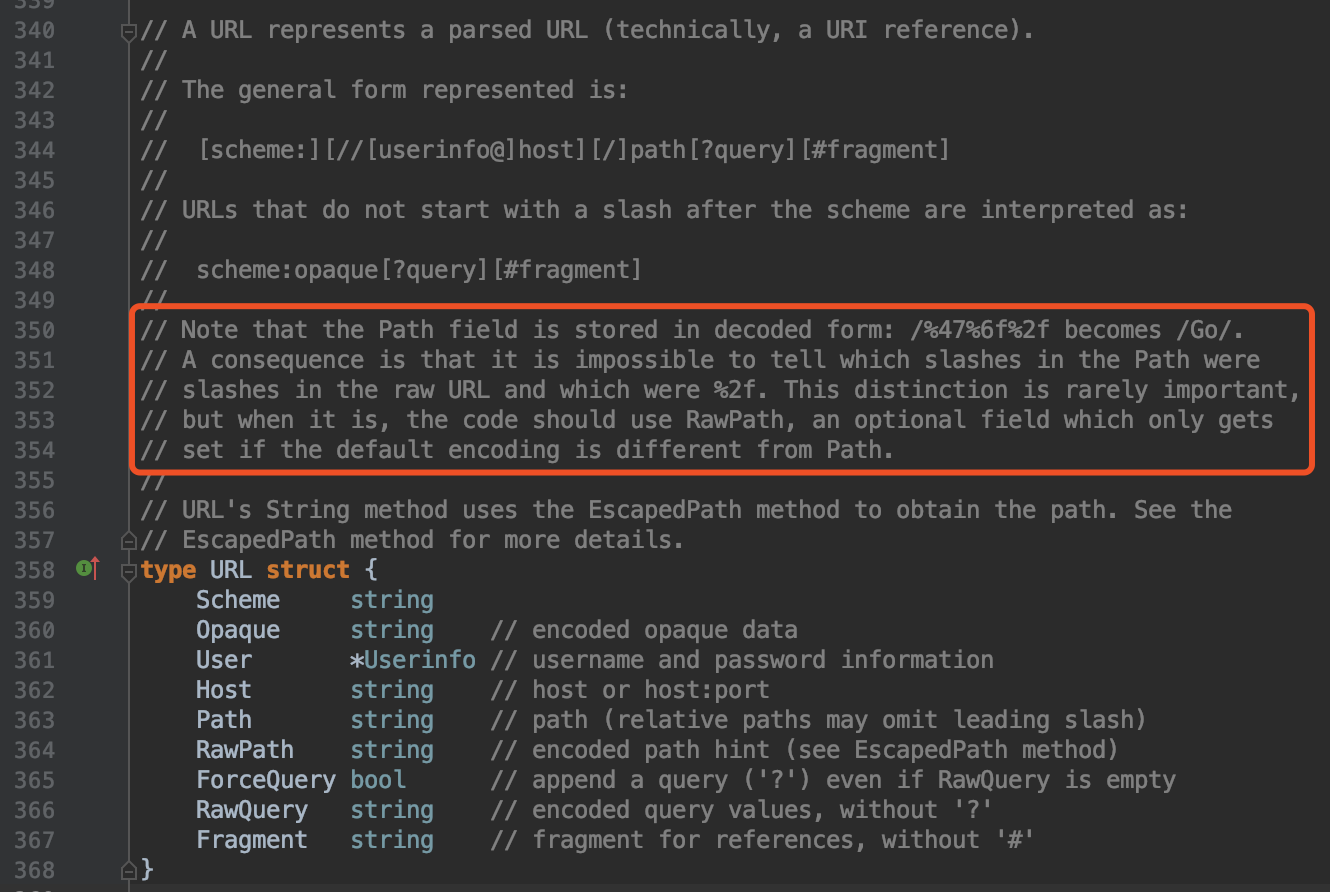
url.URL的定义,明确指出Path字段存储的是decode之后的数据,所以%2F在这里已经被转义成了/,跟之前的Path意义完全不同了。

../../images/image-20200312154454662.png